


Super X2 Sporting Shotgun Supplement to Owner's Manual
Super X2 Sporting Shotgun Supplement to Owner's Manual

Winchester is a registered trademark of Olin Corporation.
WARNING: YOU MUST READ AND UNDERSTAND ALL INSTRUCTIONS AND WARNINGS IN THE COMPLETE SUPER X2 OWNER’S MANUAL (SUPPLIED WITH YOUR GUN) AND THOSE FOUND IN THIS SUPPLEMENT BEFORE USING YOUR NEW SHOTGUN. FAILURE TO FOLLOW THESE INSTRUCTIONS OR FAILURE TO OBEY ANY SAFETY WARNING MAY RESULT IN INJURY OR DEATH TO YOURSELF OR OTHERS, OR CAUSE DAMAGE TO YOUR GUN.
If your complete owner’s manual is missing, contact U.S. Repeating Arms Company immediately for a free copy or download one at: www.winchesterguns.com
Winchester Repeating Arms
Customer Service Department (United States)
275 Winchester Avenue
Morgan, Utah 84050-9333
Phone: (800)-945-5237
General Information
General Information
This supplement addresses the unique features of the Super X2 Sporting only. General instructions and warnings are contained in the complete Super X2 Owner’s Manual. The Super X2 Sporting is a specialized version of the Winchester Super X2 design. It is made specifically for sporting clays, skeet and general trap shooting and other competition. The design is built on the reliable Super X2 platform with features to help your range scores. The Super X2 Sporting is supplied with five Invector-Plus™ choke tubes, two interchangeable gas pistons and six spacers to adjust the comb, heel and cast of the buttstock.
Chamber
Chamber
The Super X2 Sporting has a 12 gauge, 3" chamber. It is designed to handle 2 3⁄4" and 3" shells only as detailed in the next section (“Ammunition and Gas Pistons”). This includes all but extra-light loads. The Super X2 Sporting is NOT designed to handle 3 1⁄2" shells. Follow all instructions and warnings regarding ammunition and chamber length found in the complete Super X2 Owner’s Manual.
Ammunition and Gas Pistons
Ammunition and Gas Pistons
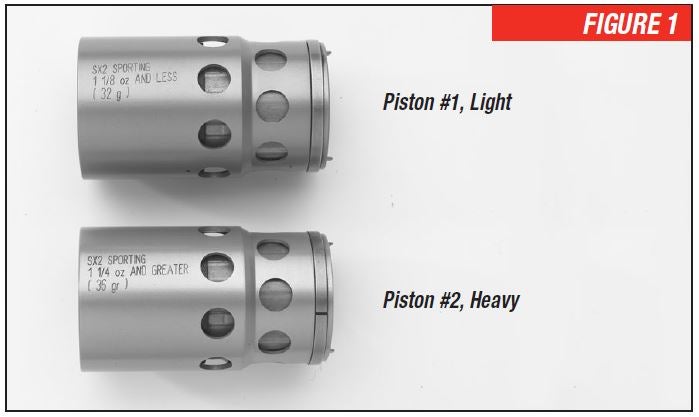
Super X2 Sporting shotguns include two separate gas pistons (Figure 1) specifically configured to handle the full spectrum of factory sporting and magnum loads. Using the incorrect piston may cause malfunction and/or cause serious, unnecessary wear on the action. Always use the correct piston for the ammunition being used. Ammunition guidelines are listed below:
PISTON #1 (LIGHT LOADS)
Piston # 1 bears the inscription: SX2 Sporting. 1 1⁄8 oz. loads and less (32 gr). This is your main piston for target shooting.
PISTON #2 (HEAVY LOADS)
Piston # 2 bears the inscription: SX2 Sporting. 1 1⁄4 oz. loads and greater (36 gr). This is your main piston for heavy loads.
ALWAYS PLACE THE “SAFETY” IN THE “ON SAFE” POSITION BEFORE BEGINNING ANY WORK ON YOUR SHOTGUN. CHECK YOUR GUN CAREFULLY TO BE CERTAIN THAT THE CHAMBER, FEED MECHANISM AND MAGAZINE CONTAIN NO SHELLS. ALWAYS KEEP THE MUZZLE POINTED IN A SAFE DIRECTION. READ AND HEED ALL SAFETY WARNINGS IN THE COMPLETE SUPER X2 OWNER’S MANUAL AND IN THIS SUPPLEMENT.
Changing the Pistons
Changing the Pistons
1. Open the action of your shotgun until it locks back.
2. Carefully remove the forearm from the magazine tube by unscrewing the magazine cap and sliding the forearm forward off the magazine tube.
DO NOT SQUEEZE HARD ON THE OPEN REAR END OF THE FOREARM. TOO MUCH PRESSURE COULD CAUSE THE WOOD TO SPLIT.
3. Remove the barrel, then exchange the gas piston. The gas piston sits on top of the gas piston sleeve with the taper of the piston toward the muzzle. Replace the barrel, the forearm and the magazine cap.
4. Make sure the magazine cap is fully tightened down. Open and close the action several times and retighten the magazine cap. This will ensure a proper seal.
Installation of Spacers to Adjust Drop at Comb, Heel and Cast On / Off
Installation of Spacers to Adjust Drop at Comb, Heel and Cast On / Off
Six spacers (Figure 2) have been included with your Super X2 Sporting shotgun. These spacers fit between the buttstock and receiver, allowing adjustments to the drop at comb, heel and cast on / off. Each spacer is labeled / stamped for what each does. One of these six spacers, the neutral spacer (No. 2), is already installed on your shotgun.
DROP AT COMB AND HEEL:
Adjusting the drop at the comb allows you to align your eye perfectly with the plane of the rib.
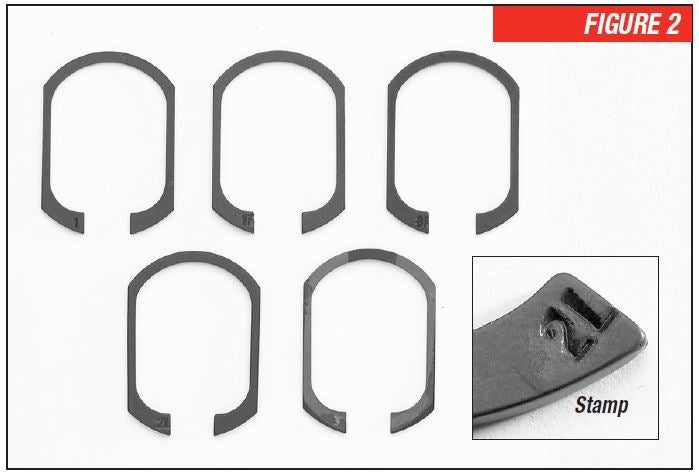
The drop measurement of the comb is determined by measuring the distance between the plane formed by the top of the rib and the forward most point of the cheek piece. The drop at heel is determined by measuring the distance between the plane formed by the top of the rib and the top end of the buttstock or recoil pad. Spacers labeled 1, 2, and 3 adjust drop at comb and heel. They do not give any cast on/off adjustment. The stock remains straight. These spacers with their respective stamps are identified here:
1. Raises the comb approximately 1 ⁄ 16", and heel approximately 1⁄ 8".
2. Neutral. This spacer is already installed on your Super X2 shotgun. It sets drop at comb at 1 1⁄2", and heel at 2 3⁄8".
3. Lowers the comb approximately 1 ⁄ 16", and heel approximately 1⁄8".
CAST ON AND CAST OFF:
Adjusting cast on and cast off allows you to achieve a perfect fit from the stock to your face. This is a most crucial adjustment, as it determines how correctly and consistently your eye will line up with the sight plane along the barrel rib. Some right-hand shooters like the stock to bend away (cast off) from the face, while many left-handed shooters prefer a bend to the left (cast on). A shotgun correctly adjusted for cast on and cast off will have you looking directly down the center of the rib with the front and middle beads in alignment.
You will notice that the two opposing edges of spacers marked 1R 1L, 2R 2L, and 3R 3L differ in thickness. In addition to adjusting the cast on/off to the right or left 0.1" per spacer (approximately 1⁄8"), spacers marked 1R 1L, 2R 2L, and 3R 3L, will also adjust the drop at comb and heel the same amount as spacers 1, 2, and 3. Cast on/off spacers, with their respective stamps are further clarified here:
1RL This spacer raises the comb approximately 1⁄16" and shooters, install this spacer with the R facing out, toward the end of the buttstock, so its thicker side is on the left side of the receiver. This casts the stock slightly to the right, away from the face of a right-handed shooter. Turn the spacer around so the L is facing out and it will cast the stock to the left.
2RL This spacer adds 1⁄8" cast to the stock and the same amount of drop (1 1⁄2") to the comb as spacer No. 2 (neutral spacer).
3RL This spacer adds 1⁄8" of cast to the stock and lowers the comb approximately 1⁄16" and heel approximately 1⁄8".
TO INSTALL A SPACER:
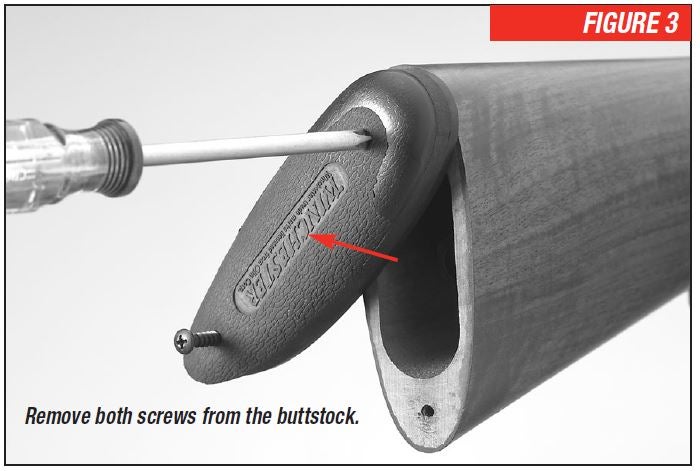
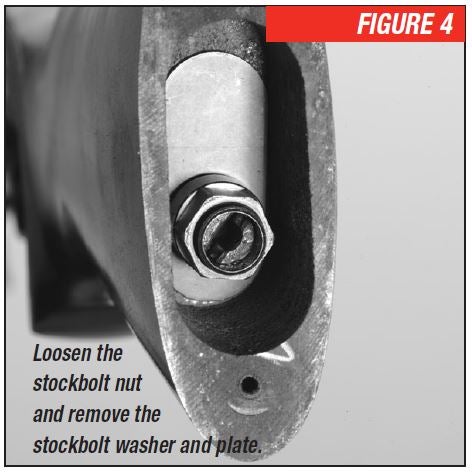
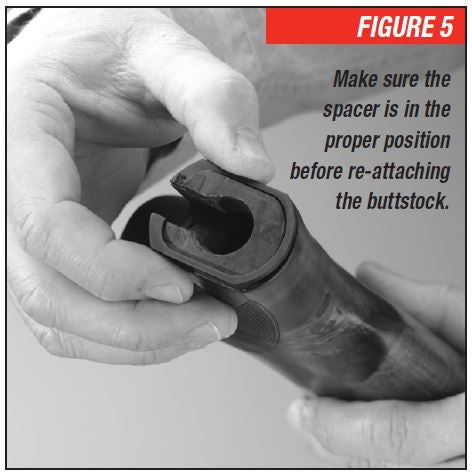
Use a cross tip or Phillips screwdriver to remove the recoil pad at the end of the buttstock. Lubricate the screw holes with petroleum jelly to prevent marring the pad with the screwdriver. Work the screwdriver tip into the two access holes in the pad, top and bottom. Make certain the tip of the screwdriver securely engages the head of the screw, then turn counterclockwise. Remove both screws, taking care not to scratch or mar the buttstock (Figure 3). Using a 3⁄4" deep socket, loosen the stockbolt nut completely, and remove the stockbolt washer and plate (Figure 4). Note for reassembly, that the washer and plate are slightly beveled, and mate with each other. Completely remove the buttstock from the receiver. Remove the existing neutral spacer and install the one you have selected. Make certain you have the proper spacer installed and in the proper position before re-attaching the buttstock and recoil pad (Figure 5).
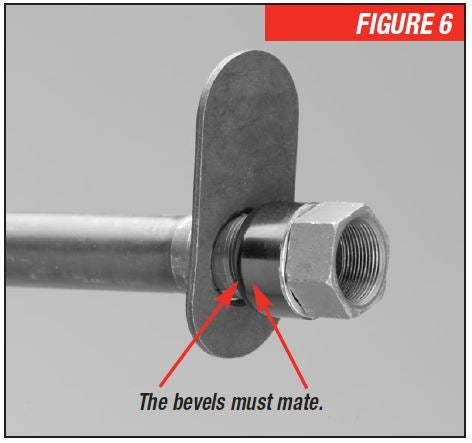
Fit the buttstock flush to the receiver and install the plate and washer — making sure the bevels mate (Figure 6). Install the nut. Snug the nut down with the 3⁄4" socket wrench, but do not overtighten. Attach the buttpad with care, so as not to scratch or mar the finish of the stock. For disassembly of the trigger group and other internal components follow instructions and warnings in the complete Super X2 Owner’s Manual.
Cleaning Parts with Special Finishes
Cleaning Parts with Special Finishes
Be especially careful when cleaning guns with Dura-Touch® Armor Coating and other special finishes. Always prevent these surfaces from coming in contact with cleaning solvents, barrel scrubbers and other strong chemicals. It is preferable to clean these surfaces with a light gun oil containing no solvents or with a damp cloth and mild dish soap (be sure to keep water out of the action). When cleaning your firearm’s bore and action, protect the external finishes from any contact with chemicals used. Also, avoid any contact between external finishes and other strong chemicals like those found in DEET-containing insect repellents, sunscreens, etc. Damage to Dura-Touch and other finishes caused by chemicals is irreversible and unrepairable.
Parts, Service, and Repair
Parts, Service, and Repair
For service, repair and parts information call for the location of the Authorized Repair Center near you: 1-800-322-4626, or contact us at:
Winchester Firearms
3005 Arnold Tenbrook Road
Arnold, MO 63010
For general questions or comments, or to obtain a complete Super X2 owner’s manual call toll-free: 1-800-945-5237.
For additional information go to the Winchester Firearms web site at: www.winchesterguns.com.
WEBSITE INFORMATION
WEBSITE INFORMATION
U.S. Repeating Arms Company offers an information resource for you on the world wide web.
- List of authorized repair centers.
- Customer service information.
- Answers to many technical and historical questions.
- Links to helpful sites.
Go to: www.winchester-guns.com