


Model 94 Pre-1992 Lever Action Rifle Supplement
Model 94 Pre-1992 Lever Action Rifle Supplement
Winchester is a registered trademark of Olin Corporation.
Instructions for Winchester Model 94 Lever Action Centerfire Carbine (Pre-1992).
Model 94 and 94 XTR Firearms with Angled Ejection
This Winchester Brand Firearm is manufactured in New Haven, Connecticut USA. This instruction folder has been produced in several languages for the convenience of sportsmen throughout the world where Winchester Brand Firearms are sold.
It is essential that these operating instructions be thoroughly studied before using the firearm to assure proper and safe gun handling.
Failure to follow these instructions or failure to obey a safety warning may result in injury to you, to others, or to the product.
Gun Safety Warnings
Gun Safety Warnings
1. Do not carry a loaded gun with a live round in the chamber while walking, running, climbing a tree, crossing a fence or anywhere you might slip or fall, drop the gun or otherwise bump or jar the gun. A gun that is dropped, bumped, or jarred with a chambered round might accidentally discharge even with the safety on, causing serious injury to you or someone else. When a round is chambered keep the safety on until you are ready to shoot.
2. Do not rely on the safety (half-cock position) to prevent accidental discharge. Many safeties merely block the trigger and prevent firing by pulling the trigger. The safety may not prevent an accidental discharge due to dropping, jarring, or bumping a gun.
3. Use only ammunition for which the gun is chambered as indicated on the barrel, to prevent excessive pressure and possible serious personal injury.
4. Incorrectly reloaded ammunition can cause serious personal injury and damage to the firearm due to excessive pressure. Reload only after proper instruction and in strict compliance with instruction and data contained in current reloading manuals.
5. Never point a gun at anything you do not intend to shoot. Always keep it pointed in a safe direction in case of accidental discharge.
6. Always check to ensure that the barrel is free of obstructions before loading and using the gun. If you experience light recoil or off sound, check the barrel for an obstruction.
7. Before firing, clean any grease or oil out of barrel with cleaning rod and patch. Grease or heavy accumulation of oil can cause excessive pressure and result in serious personal injury.
8. Keep barrel, chamber and action free of rust. Rust in the barrel and chamber can cause excessive pressures resulting in serious injury. A rusted, pitted or eroded barrel should be replaced.
9. Use hearing protection to prevent ear damage from repeated exposure to gunfire.
10. Always use proper shooting glasses to prevent eye injury from flying particles.
11. Never carry a loaded gun in a motor vehicle or carry one into a dwelling. Always carefully unload the gun before entering a motor vehicle, a dwelling or an area such as a camp. Always point a gun in a safe direction while loading or unloading to prevent serious injury in case of an accidental discharge. Never load in the house or in your vehicle.
12. Never shoot at a hard, flat surface or at the surface of water to avoid a ricochet and possible serious personal injury to yourself or a bystander.
13. Store your gun in a clean dry place out of reach of children and separated from stored ammunition. 14. Never alter any parts of your gun. Any alterations or adjustments that may become necessary to the operating mechanism should be performed by a qualified gunsmith.
14. Never alter any parts in your gun. Any alterations or adjustments that may become necessary to the operating mechanism should be performed by a qualified gunsmith.
Operating Instructions - Lever Action Centerfire Carbine
Operating Instructions - Lever Action Centerfire Carbine
CAUTION - Always keep the muzzle pointed in a safe direction. Prior to using live ammunition, familiarize yourself thoroughly with these operating instructions. Get accustomed to the feel of your new gun - Know the forces required to operate the action,· to pull the trigger and above all, know how to place the hammer into the safety position - This lever action rifle is in the safety position when the hammer is in the rebound location (28).
* ACTION: The mechanism of a firearm that loads and secures the cartridge in the chamber.
How to Place the Hammer into the Safety (Rebound) Position
How to Place the Hammer into the Safety (Rebound) Position
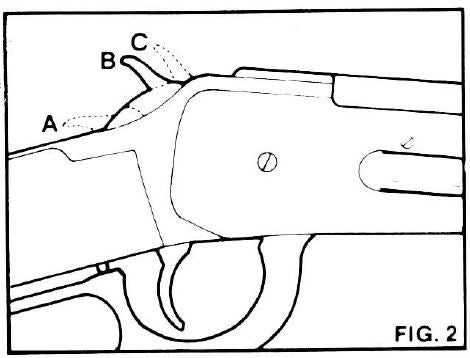
First, with the gun pointed in a safe direction, cock the hammer by swinging the lever down and back (Figure 2A). Then, firmly hold the hammer back with your thumb. While holding the hammer, apply just enough pressure on the trigger to release the hammer from the full-cock position. Immediately remove your finger from the trigger and slowly and carefully allow the hammer to lower into the "safety" rebound position (Figure 2B). When the chamber is loaded never place the hammer in the fired (down) position (Figure 2C).
WARNING - Don't place hammer in fired position (2C) when cartridge is in chamber. Pulling the trigger removes the hammer block from in front of the hammer. Any blow to the back of the hammer while the trigger is pulled can discharge the cartridge in the chamber.
The safety (rebound) arrangement is designed to protect the firing pin from being struck by the hammer unless the trigger is pulled. The rebound position is intended to provide protection against unintentional or accidental firing.
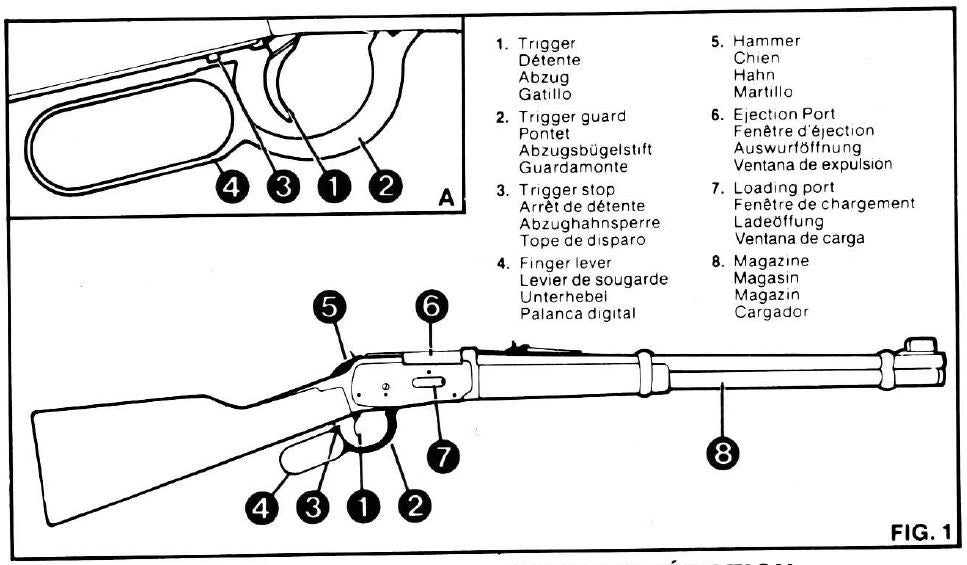
In order to fire your Lever Action Rifle it is necessary for the finger lever to depress the trigger stop (Figure 1 A). The trigger stop is not a safety but an interlock to assure that the breech is fully closed before a cartridge can be discharged. Do not rely on the trigger stop to prevent accidental discharge.
WARNING - As is true with other firearms, the safety mechanism, when it is engaged is designed to prevent accidental discharge. However, this mechanism will not necessarily prevent the accidental discharge of this firearm as a result of jarring or abuse such as occurs when a firearm is dropped.
IMPORTANT - Clean the inside of the barrel and chamber to remove all grease and other possible obstructions before firing your gun.
How to Load
How to Load
HOW TO LOAD - Use the correct ammunition referenced by the inscription on the barrel. Before loading your gun be sure all grease and oil has been removed from the barrel and chamber, and there is no obstruction.
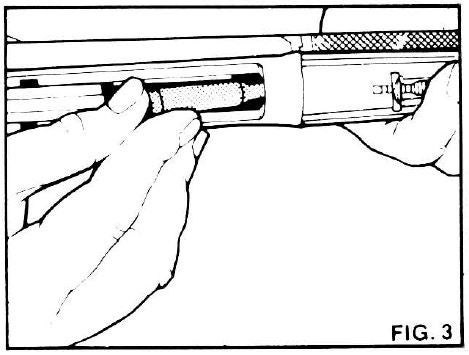
The chamber may be loaded by placing a cartridge directly into the chamber through the opened action (Figure 3). or by transferring a cartridge that was previously loaded into the magazine. to the chamber by operating the finger lever. In either case, always place the hammer into the safety (rebound) position upon closing the action (Figure 28)
To Load the Magazine
To Load the Magazine
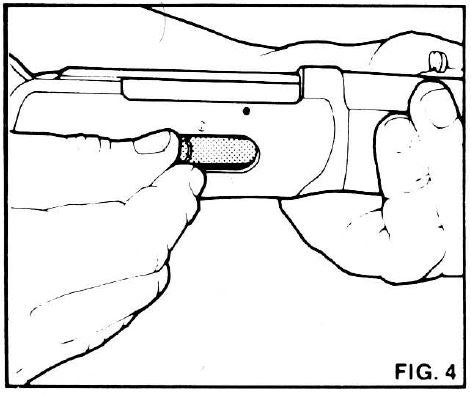
The magazine is loaded through the port on the right side of the receiver. With the action closed and the hammer in the safety (rebound) position, press the spring cover inward with the tip of the first cartridge. push forward on the cartridge until all but the rim has entered the loading port (Figure 4). Then. insert the next cartridge in the same manner. pushing the preceding cartridge into the magazine. Repeat this procedure with each cartridge. but push the last cartridge past the end of the spring cover. allowing the cover to snap closed. Do not exceed the recommended capacity of the magazine.
How to Operate
How to Operate
With a loaded cartridge in the chamber. the hammer in the safety (rebound) position and your finger off the trigger, firmly position your thumb on the hammer spur and draw the hammer back to the full cock position. Your rifle is now ready to fire. Firmly shoulder your gun. take aim and when on target pull the trigger.
To chamber another round for the next shot, swing the finger lever down. extracting and ejecting the fired cartridge case from the chamber. The closing of the action will transfer a new cartridge from the magazine to the chamber, leaving the hammer in a cocked "ready to fire" position. When through firing always place the hammer in the safety (rebound) position (Figure 28).
To Unload Chamber and Magazine
To Unload Chamber and Magazine
With the gun pointed in a safe direction and your finger off the trigger, swing the finger lever downward removing the cartridge from the chamber. Then proceed to operate the finger lever transferring the cartridges from the magazine to the chamber and out.
IMPORTANT-Always visually check and know for sure that your gun is not loaded, by viewing both the chamber and the magazine through the open action.
Sight Adjustments
Sight Adjustments
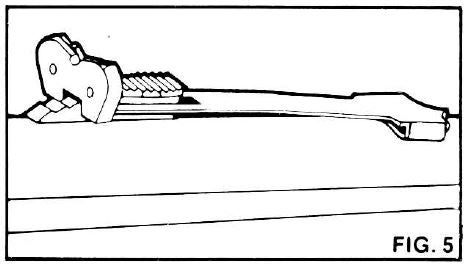
Your firearm can be adjusted to shoot higher by moving the rear sight elevator backward by one or more notches. In order to shoot lower. the elevator can be moved forward (Figure 5).
By gently tapping the rear sight base (where fastened to the barrel) to the right. your gun will shoot more to the right. An adjustment to the left can be made by tapping the base to the left. If necessary. an additional elevation adjustment can be made by loosening the two (2) small screws securing the rear sight blade to the rear sight base. Move the blade up or down and tighten the screws.
Care should be taken not to mar the finish or bend sights when adjustments are made. A brass or fiber hammer is preferred for this operation.
Sight Adjustments - 307, 356 and 375 Only
Sight Adjustments - 307, 356 and 375 Only
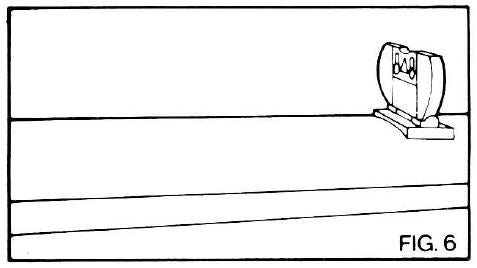
Your gun can be adjusted to shoot higher by loosening the two small screws on the back of the leaf and moving the blade up one or more lines. In order to shoot lower. the blade can be lowered. Retighten the screws when finished with adjustment (Figure 6).
By gently tapping the rear sight base (when fastened to the barrel) to the right. your gun will shoot more to the right An adjustment to the left can be made by tapping the base to the left
Care should be taken not to mar the finish or bend sights when adjustments are made. A brass or fiber hammer is preferred for this operation.
Ordering Parts
Ordering Parts
INSTALLATION INSTRUCTIONS
Can be used in either right hand or left hand position. To Install: Position the extension so that the round. hollow edge is facing left or right. as preferred, at the farthest forward possible position on the hammer. Tighten set screw (inside hollow extension facing) with the alien wrench provided. The blue-green substance on the set screw is a self locking compound. If you have trouble getting the set screw started, clean out one thread before trying again. Try extension and hammer for proper function and check to make sure that there is clearance between extension surface and gun frame in cocked position scope when uncocked. If there isn't sufficient clearance between extension and frame or scope. reposition extension on hammer until it clears. Then remove the extension and carefully centerpunch the mark left by set screw on hammer (be sure to support hammer while doing this operation to prevent damage to gun). Coat the set screw with Loctite" or other locking formula, and reinstall in previously determined position, tightening set screw fully with wrench provided.
Maintenance
Maintenance
1. Be sure that your gun is unloaded before attempting to clean.
2. The gun owner is responsible for periodic inspection and proper maintenance by a qualified gunsmith to ensure that this firearm remains in proper adjustment and that worn parts are replaced.
3. REMEMBER - Rust is neglect - Make sure all exposed metal surfaces are coated with a film of oil. After being subjected to damp weather. thoroughly wipe the bore and wipe off the metal surfaces. Then apply a new film of oi1. If exposed to a soaking rain. snow or salt spray a more thorough cleaning and oiling may be necessary. requiring removal of the trigger guard and breech bolt assemblies.
4. Between seasons. apply a coat of grease to the bore and metal parts and store in a dry place. Do not plug the barrel. or store in a case made of fabric or material which will absorb the lubricant from the gun.
5. Repair parts are available through your local authorized Winchester Dealer - or authorized service center. Please be sure to include the Model number and Serial number of your gun when ordering parts.
WARNING: YOU ARE RESPONSIBLE FOR FIREARMS SAFETY
WARNING: YOU ARE RESPONSIBLE FOR FIREARMS SAFETY
As a gun owner, you accept a set of demanding responsibilities. How seriously you take these responsibilities can mean the difference between life and death. Failure to follow any of these instructions can cause extensive damage to your gun and/or possible serious injury or death to yourself and others. There is no excuse for careless or abusive handling of any firearm. At all times handle any firearm with intense respect for its power and potential danger.
PLEASE READ AND UNDERSTAND ALL OF THE CAUTIONS, PROPER HANDLING PROCEDURES AND INSTRUCTIONS OUTLINED IN THE OWNER’S MANUAL BEFORE USING YOUR NEW FIREARM.
1 - ALWAYS KEEP THE MUZZLE OF YOUR FIREARM POINTED IN A SAFE DIRECTION EVEN THOUGH YOU ARE CERTAIN IT IS UNLOADED. Never point any firearm at anything you do not intend to shoot. Be extremely alert and aware of all persons and property within the range of your ammunition.
2 - NEVER RELY TOTALLY ON YOUR FIREARM'S MECHANICAL “SAFETY” DEVICE.
The word “safety” describes a firearm’s trigger block mechanism, sear block mechanism, hammer block mechanism, or firing pin block mechanism. Mechanical “safeties” are designed to place your firearm in a safer status, and no guarantee can be made that the firearm will not fire even if the “safety” is in the on safe position. Mechanical “safeties” merely aid safe gun handling and are no excuse for pointing your firearm’s muzzle in an unsafe direction. See “Operation of the Safety” section below for instructions on the operation of this firearm’s “safety.”
LIKE ANY MECHANICAL DEVICE, A "SAFETY" CAN SOMETIMES FAIL; IT CAN BE JARRED OR INADVERTENTLY MANIPULATED INTO AN UNSAFE CONDITION.
Mechanical "safeties" merely aid safe gun handling and are no excuse for pointing your rifle's muzzle in an unsafe direction.
While it is a good idea to "test" your rifle's mechanical "safeties" periodically for proper function, NEVER TEST IT WHILE YOUR RIFLE IS LOADED OR POINTED IN AN UNSAFE DIRECTION
Safe gun handling does not stop with your gun's mechanical "safety devices -- it starts there. Always treat your rifle with the respect due a loaded, ready-to-fire firearm.
3. WHENEVER YOU HANDLE A FIREARM, OR HAND IT TO SOMEONE, ALWAYS OPEN THE ACTION IMMEDIATELY, VISUALLY CHECK YOUR RIFLE'S CHAMBER, FEED MECHANISM AND MAGAZINE.
Make certain they do not inadvertently contain any ammunition. Always keep the chamber empty and "safety" in the "on safe" position unless shooting is imminent.
4. DO NOT TRANSPORT YOUR RIFLE LOADED, WHETHER IN A SCABBARD, GUN CASE, OR OTHER CONTAINER.
5. HUNTING FROM ELEVATED SURFACES SUCH AS TREE STANDS IS DANGEROUS, and may increase the risk of handling a firearm. The following rules should always be observed by you and those you hunt with: Always make certain that the stand being used is safe and stable. Always make certain that your firearm is unloaded when it is being taken up to and down from the stand. Always make certain that your firearm is not dropped from the stand, or dropped while it is being taken up to or down from the stand. Remember, a loaded firearm may discharge when dropped, even with the safety in the "on safe" position.
6. BEWARE OF BARREL OBSTRUCTIONS, for the safety of both your gun and yourself. Mud, snow, and an infinite variety of other obstructions may inadvertently lodge in a barrel bore. It takes only one small obstruction to cause dangerously increased pressures that can ruin (swell or rupture) the finest rifle barrels.
BEFORE CHECKING FOR A BARREL OBSTRUCTION, BE CERTAIN NO LIVE ROUND IS IN THE CHAMBER AND THAT THE MAGAZINE IS REMOVED AND FEED MECHANISMS ARE COMPLETELY EMPTY. PLACE THE "SAFETY" IN THE "ON SAFE" POSITION.
Look through the barrel to be sure it is clear of any obstruction. If an obstruction is seen, no matter how small it may be, clean the bore with a cleaning rod and patch as described in "Cleaning and Maintenance Suggestions." Before the first firing, clean the bore with a cleaning rod and patch, and wipe away any anti-rust compound in the action / chamber areas.
7. ALWAYS UNLOAD YOUR RIFLE WHEN NOT IN USE. REFER TO "UNLOADING THE RIFLE" FOR AN EXPLANATION OF HOW TO UNLOAD YOUR RIFLE PROPERLY.
As a safety precaution, it is preferable to disassemble your gun for storage. Store your gun and ammunition separately -- well beyond the reach of children. Take all safeguards to ensure your rifle does not become available to untrained, inexperienced or unwelcome hands.
8. USE THE PROPER AMMUNITION.
The barrel and action of this rifle have been made with substantial safety margins over the pressures developed by established American commercial loads. Nevertheless, Browning assumes no liability for incidents which occur through the use of cartridges of nonstandard dimensions which develop pressures in excess of commercially available ammunition with standards established by the Sporting Arms and Ammunitions Manufacturers' Institute (SAAMI).
BE ALERT TO THE SIGNS OF AMMUNITION MALFUNCTION.
If you detect an off sound or light recoil when a cartridge s fired, DO NOT LOAD ANOTHER CARTRIDGE INTO THE CHAMBER. Open the action and remove all cartridges from the magazine, chamber and action areas. With the action open, glance down the barrel to make sure that an obstruction does not remain in the barrel. If there is an obstruction, completely clear the barrel before loading and firing again. Failure to follow these instructions can cause extensive damage to your gun and possible serious injury to yourself and others.
MAKE SURE OF ADEQUATE VENTILATION IN THE AREA THAT YOU DISCHARGE A FIREARM. WASH HANDS THOROUGHLY AFTER EXPOSURE TO AMMUNITION OR CLEANING A FIREARM.
Lead exposure can be obtained from discharging firearms in poorly ventilated areas, cleaning firearms or handling ammunition. Lead is a substance that has been known to cause birth defects, reproductive harm and other serious injury.
9. DO NOT SNAP THE FIRING PIN ON AN EMPTY CHAMBER -- THE CHAMBER MAY NOT BE EMPTY!
Treat every gun with the respect due a loaded gun, even though you are certain the gun is unloaded.
10. KEEP FINGERS AWAY FROM THE TRIGGER WHILE UNLOADING, LOADING, UNTIL YOU ARE READY TO SHOOT.
11. BE SURE OF YOUR TARGET AND BACKSTOP.
Particularly during low light periods. Know the range of your ammunition. Never shoot at water or hard object.
12. ALWAYS UNLOAD YOUR RIFLE'S CHAMBER BEFORE CROSSING A FENCE, CLIMBING A TREE, JUMPING A DITCH OR NEGOTIATING OTHER OBSTACLES.
Refer to "Unloading The Rifle" for instructions on the unloading of your rifle. Never place your loaded rifle on or against a fence, tree, car or other similar object.
13. WEAR EYE AND EAR PROTECTION WHEN SHOOTING.
Unprotected, repeated exposure to gunfire can cause hearing damage. Wear ear protectors (shooting ear plugs or muffs) to guard against such damage. Wear shooting glasses to protect your eyes from flying particles. Allow proper distance (eye relief) between the scope and your eye when firing a scoped rifle or shotgun. Always keep a safe distance between the muzzle of your firearm and any persons nearby, as muzzle blast, debris and ejecting shells could inflict serious injury. Also, wear eye protection when disassembling and cleaning your shotgun to prevent the possibility of springs, spring-tensioned parts, solvent or other agents from contacting your eyes.
14. DROPPING A LOADED GUN CAN CAUSE AN ACCIDENTAL DISCHARGE even with the "safety" in the "on safe" position. Be extremely careful while hunting or during any shooting activity, to avoid dropping any firearm.
15. IF YOUR RIFLE FAILS TO FIRE, KEEP THE MUZZLE POINTED IN A SAFE DIRECTION. Hold this position for a minimum of 30 seconds. Carefully open the action and remove the cartridge. If the primer is indented, the cartridge should be disposed of in a way that cannot cause harm. If the primer is not indented, your firearm should be examined by a qualified gunsmith and the cause of the malfunction should be corrected before further use.
16. BE DEFENSIVE AND ON GUARD AGAINST UNSAFE GUN HANDLING AROUND YOU AND OTHERS.
Don't be timid when it comes to gun safety. If you observe other shooters violating any of these safety precautions, politely suggest safer handling practices.
17. BE CERTAIN YOUR RIFLE IS UNLOADED BEFORE CLEANING. Because so many gun accidents occur when a firearm is being cleaned, special and extreme care should be taken to be sure your gun is unloaded before disassembly, cleaning and reassembly. Keep ammunition away from the cleaning location. Never test the mechanical function of any firearm with live ammunition.
18. TEACH AND SUPERVISE FIREARMS SAFETY TO ALL MEMBERS OF YOUR FAMILY --ESPECIALLY TO CHILDREN AND NONSHOOTERS.
Closely supervise newcomers to the shooting sports. Encourage enrolling in hunting/shooting safety courses.
19. NEVER DRINK ALCOHOLIC BEVERAGES OR TAKE ANY TYPE OF DRUGS BEFORE OR DURING SHOOTING.
Your vision and judgment could be dangerously impaired, making your gun handling unsafe to you and to others.
20. READ AND HEED ALL WARNINGS in this instruction book, on ammunition boxes and with all accessories that you install on your firearm. It is your responsibility to secure the most up-to-date information on the safe handling procedures of your Browning gun. Browning assumes no liability for incidents which occur when unsafe or improper gun accessories or ammunition combinations are used.
21. PERIODIC MAINTENANCE -- AVOID UNAUTHORIZED SERVICING.
Your rifle is a mechanical device which will not last forever, and as such, is subject to wear and requires periodic inspection, adjustment and service. Browning firearms should be serviced by a Browning Recommended Service Center or by Browning's service facility in Arnold, Missouri. Browning cannot assume any responsibility for injuries suffered or caused by unauthorized servicing, alterations or modifications of Browning firearms.
22. BROWNING RESERVES THE RIGHT TO REFUSE SERVICE ON FIREARMS THAT HAVE BEEN ALTERED, ADDED TO OR SUBSTANTIALLY CHANGED.
Removal of metal from barrel(s), or modification of the firing mechanism and/or operating parts may lead to Browning's refusal of service on such firearms. Browning will charge the owner parts and labor to return the firearm to original Browning specifications.
DO NOT, UNDER ANY CIRCUMSTANCES, ALTER THE TRIGGER, SAFETY OR PARTS OF THE FIRING MECHANISM OF THIS OR ANY OTHER FIREARM. FAILURE TO OBEY THIS WARNING MAY RESULT IN INJURY OR DEATH TO YOURSELF OR OTHERS.